Photobucket Photobucket Photobucket Photobucket Photobucket
Showing posts with label Sewing. Show all posts

Saturday, November 2, 2013

Mid-Town Trench---Finished!

I FINALLY finished the Mid-Town trench jacket from Indygo Junction that I've been slowly working on. See initial post. I'm quite pleased with the results but if I had to do it all over again, here are the lessons I've learned: 1. I love tweed. I think it is so classy but it is extremely thick and difficult to work with sometimes.

2. I opted out of putting buttons on this jacket for reason #1. Next time I'll choose a cute, thin cotton and then use the buttons I purchased.

3. Next time around I'll plan a liner for the jacket. Either that or I'll have invested in a serger. This coat is not very pretty on the inside. A fashion design student at CSU found it really cute so I'll put that in the win column. See how the wind flapped my jacket bottom and because I had no serger, it looks messy? The solution is for me to take the time to build in a liner. Look for that post sometime next year. Ha ha....

Now for the things I love about the Mid-Town Trench:

1. I love the cut and think it is a timeless classic cut. I chose tweed because I do think it is a classic cut and tweed works well with such a cut.

2. The collar is super cute. Takes me back to the Jackie-O days. I love her coats--every one of them.

3. The length is cute. The pattern actually calls for a longer jacket and you can tell by the pattern, their jackets sit at their knees. I'm not super tall so I opted to shorten it a bit.

4. I love the pleats in the back.

Photobucket

Pin It!

Monday, March 11, 2013

Midtown Trench

The weatherman predicted 8-14 inches of snow here this weekend. So, I hunkered down with a new sewing project. Turns out we got only an inch that melted by mid-morning.

I saw the Midtown Trench pattern by Indygo Junction at my local sewing shop and the owner had made the khaki-colored coat. It was soooo cute, I knew I had to make one. It looked very Jackie-O and I love that in a coat. I bought some tweed fabric for my coat.

So, I got to cutting....

Then to ironing.....

Then to working on the pleats......

I can't wait to show you the results really soon!

Photobucket

Pin It!

Sunday, February 10, 2013

Felted Pin Hearts as Valentines

We're finally just getting into the Valentine's Day swing around here. It seems like just yesterday I put away the Christmas decorations. I'm still in denial that the first month of 2013 is already over!

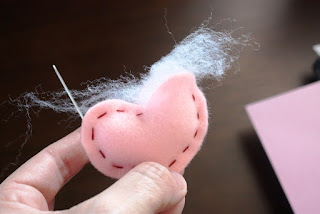
MiniMe wanted to make something special for the girls in her class. We thought a felted heart that the girls can pin on their coats or purses or backpacks would be fun. Here is what you'll need (image doesn't include everything so please read list):

Red and/or pink felt sheets (8 1/2 x 11)

Embroider floss (Red floss for pink felt and pink floss for red felt)

Needle

Scissors

Stuffing

Glue gun/glue

Hole punch

Flat brooch pins

Red and/or pink construction or scrapbooking paper

Valentine or heart stickers

White construction paper (to write Valentine note on)

Begin by cutting a heart template from construction paper. Once you have the heart just as you want it, you'll fold your felt so that when you cut around the template, you're actually cutting two hearts. Cut as many as needed.

You'll then separate the embroidery floss in half (into three strands) and cut enough so that you can sew around your entire heart. Make a knot at the end of the floss and insert your needle through the inside of one of the felted hearts (to avoid an unsightly knot).

Then you will stitch around the edge of the heart and stop just short so that you have enough open area to insert the stuffing.

Insert just enough stuffing to give the heart a puff. If you stuff too much, the heart is hard to sew closed and loses shape. If you can't seem to stuff it in cleanly, don't worry too much. You can cut the excess stuffing around the heart when finished.

Finish stitching back to your starting point. Make sure to knot your embroidery thread on the inside to hide the finishing knot.

Cut a matching piece of felt that will fit inside of your pin.

Shoot a straight line of glue on back of heart and place felt and pin on it until dry.

From here you can probably get super creative with the decorations on the card. We decided to stay simple. I found the middle of the card (at the top) and made a mark on either side of the halfway mark to holepunch. This ensures the heart is centered. You can use the first precise holepunches you make as a template for the others you have left.

Pin the hearts to the cards and decorate. We used white construction paper and stickers to decorate ours. I hope the girls in the class like her valentine to them!

Photobucket
Pin It!

Monday, June 13, 2011

Joel Dewberry Quilt

I *heart* Joel Dewberry fabric!!! I have been wanting to start a new quilt and when I saw Joel's new line, I couldn't pass it up. Not every piece is JD fabric, but the majority is. Here is the pattern I'm going to use:


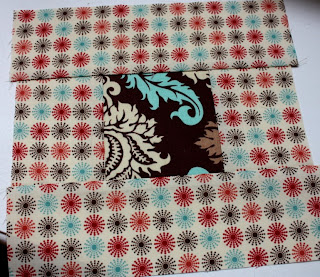
And here are a few finished squares:


Pin It!

Saturday, June 11, 2011

Daisy and Eddie


I am a huge fan of all items Hillary Lang creates. She is, well, amazing! I received her Wee Wonderfuls book as a gift and my kiddos love to flip through it making requests. I finally got around to making two little cuties for MiniMe and MiniB.


When I was little, my mom made me my own Raggedy Ann and Andy dolls. I am so touched that my kids seem to cherish these dolls even more than store-bought toys. I can't wait to make more for them!

Pin It!

Friday, November 13, 2009

Finished Purse


Every year, my church has an annual auction to raise money for a local organization. And every year I have donated a handmade felted purse. This year I decided to go the fabric route. I think it came out pretty cute!


Pattern is from this month's Quilts and More magazine. Handles are from Kati Cupcake.

Other side:


Inside:


And, MiniB wanted to be included in a picture tool!

Pin It!

Wednesday, August 5, 2009

(Almost) Finished Snippets Quilt


I got the Snippets American Girl quilt back from the long-arm quilter! For background on this quilt, read here, here, here, and here. It's been a long time coming. This one took me four months. Whew! And by the time I get the binding on, it could be fall. Oh well. I still love seeing it almost completed!

Pin It!

Wednesday, July 22, 2009

Finished Table


Do you remember this table? You can read about it here. Basically I paid $15 for it on Craigslist (and got a nice Singer sewing machine with it too!).

Well, I sanded, primed, repainted, and put all new hardware on it and here is the finished result!


I am so happy with the end result. It is hard to get a good image that captures the color but it is basically a green/blue shade of paint. I think it is cute and much more functional than my old table!

Pin It!